Forms
Forms in Access provide the human-computer interface
for most database actions and operations. They provide a container
for CONTROLS (like option buttons, list boxes, radio buttons),
DATA DISPLAY as positioned fields (with font and colour control)
and SUBFORMS (forms within forms).

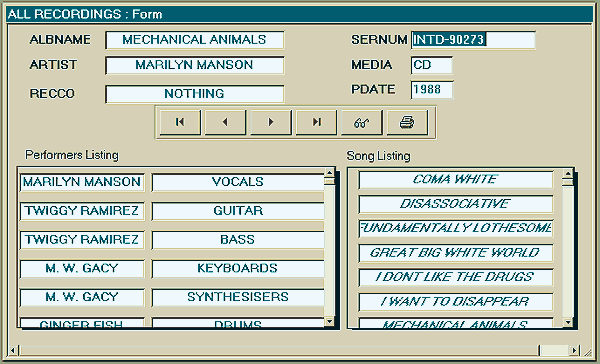
In the form pictured, a range of Access controls have been
used to display data from 3 underlying tables. The form contains 2
sub-forms, each of which displays the formatted result tables
of equijoins with the main form table. Command buttons have been placed
to provide a navigation pad for the user, and form properties have
been engineered to prevent the user from performing certain actions.
Values from tables have been formatted, with fonts, colours and sizes
all specified to create a certain look.
To CREATE A NEW FORM choose New from the Form Database
Window (or press the New Form Button on the Button Bar) then the New
Form button. You will be presented with a blank Form builder grid,
and be required to nominate tables or queries that are involved in
the query (choose blank form if no table is involved in the form).

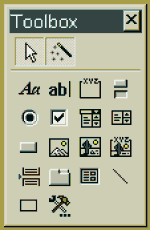
Each form element may be placed on a form through the use of the
FORMS TOOLBOX. The toolbox provides a Pick Tool (for
selecting form elements), a Label Tool (for adding text labels
to the form), Text Box (for creating a text-wrapped area of
text on a form), Option Group (that allows you to specify that
the user only makes one choice from those presented), Toggle Button
(to turn something on/off), Radio Button (true/false), Check
Box (yes/no), Combo Box (that provides lists of values
and the ability to enter values to the list), List Box (which
displays lists), Graph Tool (for displaying imported graphs),
Subform/Report (allowing you to nest one form inside another),
OLE Object Tool (allowing you to import objects from other
packages for use and display on a form), Bound OLE Object Tool
(allowing OLE objects from the database to be displayed), Line
Tool, Rectangle Tool, Page Break, Command Button Tool (allowing
you to place action controls on the form) as well as Tool Lock
(to re-use a tool without re-selecting it).
To place fields from your database onto the form, click the
field list button on the button bar, then drag and drop the field
into the position you want it. By default the column name is supplied
as a label for the field but you are free to remove or modify this
to what ever you wish.
All form elements have a range of PROPERTIES which may include
their ForeColour (usually the colour of text components), BackColour,
BorderColour along with Border Styles and Special Effects.
Most visual properties for form elements are controlled using the
Forms Palette. As with object-oriented (vector-mapped) graphics
packages, point-and-click will select the elements to change on a
form, menu choices effect selected elements only.
Event driven properties and data properties of form elements like
sub- forms, control buttons and the like can be directly specified
using by first selecting the relevant object, and then opening a properties
sheet for that object (pressing the properties button on the button
bar does this). A huge range of control is on offer in the property
sheets, and these properties are grouped logically into Data, Layout,
Event and other properties or can be displayed all together.
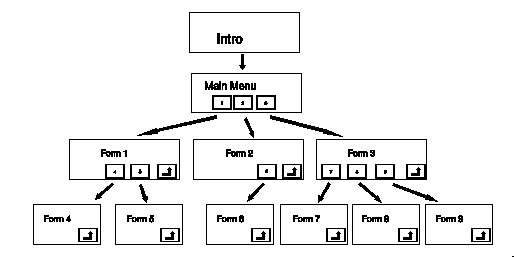
Hierarchical menu systems can be constructed in Access by providing
a master form with command buttons that open other forms that open
other forms (usually using Macros - see Section 3.7). Each form should
have navigation control buttons to launch lower level forms along
with a close button to return to the previous level. As a general
rule, form style should be planned out to provide the user with a
consistent look or feel.

By using graphics packages (like Windows Paintbrush), it is possible
to customise the appearance of your forms by creating your own bitmap
button faces (which must be created actual size) and backgrounds (these
are unbounded OLE objects that are formatted to the back and automatically
scaled by Access if appropriate size mode properties are selected).
By placing graphics to the back, and form controls and data fields
on top, the look of a form can be very sophisticated. Transparent
buttons can provide 'hot area' triggers for events (as opposed to
the 'chunky' default appearance of buttons.
Graphics created externally may be created at their finished size
before incorporating them into forms, or it is possible to get Access
to scale them - proportional scaling as well as 'warping' is possible
to customise graphic areas.
If objects are EMBEDDED, the database can swell in size rapidly as
a copy of the graphic is saved into the .MDB file. On the other hand,
you can LINK objects to your system - this creates a link (or file
reference) between your database and the external object file. This
means that the resulting database will be smaller, but performance
will be marginally slower, and all of the separate linked object files
will need to be transported with the database (in the same directory
locations they were first linked from).
Good looking forms can be costly (in terms of time taken to create
them). The value of an intuitive interface for your system, however,
is that it will encourage the user to use it. Ensure that your collection
of forms within a system is consistent with respect to colors, format
and control selection. Users will be 'put off' if they have to learn
a different set of navigational skills for each new form presented,
if they have to search in different locations for similar controls
or select controls with similar descriptions bu which have vastly
different actions. As a golden rule, recognise that the only reason
for constructing the system is to give the user power over information
stored in it - you must do the right thing by your users.
Reports
A Report in Access provides the designer with the facility to output
information stored in the database in a form that is suitable to print.
In general principle, they are similar to forms - data from base tables,
queries or both are displayed using page layout tools. Indeed, pre-existing
forms can also provide the data and format for report elements.
Access' report generator appears similar to the Form design view,
with many of the tools being identical, so why use them? Reports provide
the designer with the precise page formatting controls necessary to
print multi-page documents, including full print preview and many
'word processor' tools. This is coupled with powerful grouping and
arrangement facilities to allow customisation of the appearance of
data and subsequent hardcopy from your system.
Macros
Access Macros, like macros in other packages, provide the facility
to save sequences of database actions in an executable form. Typically,
macros allow multi-phase operations including query execution, form
operation, report generation and manage human-computer interaction.
Macros are often placed behind buttons on forms, providing convenient
triggers for events in the database system.
The macro builder screen allows you to sequence macro action statements
providing fine control for each statement as you build. In deciding
to use a macro, careful though must be given to WHAT actions are required,
how the actions should BEHAVE and WHEN the various actions should
occur (sequence). Macro actions can be 'all or nothing' in their execution
or can be conditionally executed (based on some set of conditions
that are generated within your system).
Below are a few of the more commonly used macro actions, along with
some of the attributes that are customisable with them:
BEEP causes a PC speaker beep - useful for alerting the
user to some condition error or not
CLOSE you specify the object type (form, query, report..)
to be closed and its name. In hierarchical menu systems, it is in
most cases faster NOT to close the PARENT FORM on launching a CHILD
FORM (especially if the CHILD allows reversion back to the PARENT).
ECHO set to NO will supress the intermediate execution messages
generated by your macro (like echo off in DOS)
HOURGLASS if set to YES will change the appearance of the
cursor to to an hourglass in the event of any delay in the exectution
of the macro - useful in reassuring the user that something is actually
happening
MAXIMISE
MINIMIZE both effect the active window (the first makes the
current screen grow to the full size of the Access window, the other
reduces the current window to an ICON at the bottom of the Access
window.
MOVESIZE allows you to specify RIGHT, DOWN, WIDTH and HEIGHT
to automatically re-position and re-size the active window
MSGBOX allows you to display a 'cutesy' message window to
emphasise some point
OPENFORM with where clauses, filters and DATA MODE (which
can be set as ADD:a blank form for entry of new records; EDIT: modify
existing records; or READONLY: locking any changes out but allowing
viewing of existing records).
OPENQUERY; OPENTABLE
OPENREPORT all allow you to launch pre-defined database objects,
and specify the VIEW of them presented when launched.
OUTPUTTO should you require Queries, tables, reports or
other database objects to generate ASCII files (or other application
native file formats) this is the command for you as you get to specify
FORMAT and complete OUTPUT FILE name and path
PRINT allows you to specift RANGE, PAGES from..to, QUALITY
and COPIES - useful if your system should need to appear to 'automatically'
generate hardcopy.
QUIT EXITs Access and allows you to specify SAVE modes for
currently open database objects.
SETVALUE provides the facility to assign values or expressions
to items (variables) for use in active or soon to be active database
objects
It appears that macro commands are mnemonic Access BASIC procedures
(as they are sometimes converted into Event Procedures when flipping
between DesignView and FormView - this however needs further investigation)
- don't be too put off by this.


