INTRODUCTION TO MACROS - A Simple Menu Hierarchy
In this exercise, you will create a simple one level menu system
that uses as its child forms three copies of the same form behaving
differently to allow add/view/modify facilities easily.
Go to the Macro section of the Database Window and select New and
you are presented with the macro builder window.
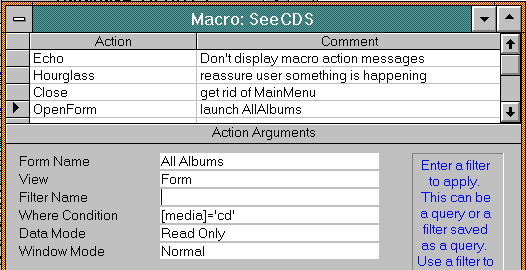
Set the following sequence ACTIONS, ARGUMENTS and COMMENTS():

- ECHO = No
- HOURGLASS = Yes
- CLOSE = form, MainMenu
- OPENFORM = AllAlbums, View=form, Datamode= ReadOnly, WhereCondition:
media =
- 'cd', then Save the macro as SeeCDs
Go to the FILE menu and Save As (a second copy of the macro to save
time creating a similar command sequence) and save as EditLPs, change
the WhereCondition to media = 'lp', and DataMode = Edit, then SAVE
the finished second macro.
Go to the FILE menu and Save As (a third copy of the macro to save
time creating a similar command sequence) and save as AddNew, delete
the WhereCondition, change the DataMode = Add, then SAVE the finished
third macro.
Close the macro builder screen - you should notice that there are
3 macros saved into your database container.
To construct the menu screen to run these macros, firstly select
New Form then Blank Form from the Form Window but don't elect to use
a table as the basis of the form.

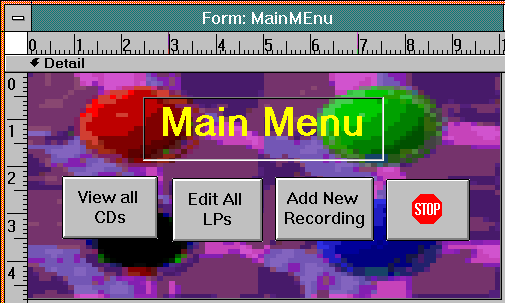
Notice in the form , the title text is in a clear indented rectangle,
there is a background unbound bitmap and 4 command buttons. The first
three command buttons have actions categorized as Miscellaneous, which
are RunMacro operations with text button faces, the fourth button
is a Form Operation button that closes the current form (Incidentally,
opening the properties sheet of the STOP button shows that the ON
CLICK property is an [Event Procedure] and is editable only in Access
Basic).
Open the MainMenu form properties, change the CAPTION to The Music
Database; Set the DEFAULT VIEW: Single Form; SCROLL BARS: Neither;
Max&Min Buttons:No and RECORD SELECTORS: No.
Switch to FORM VIEW and position and resize the form so there is
no whitespace visible on the form and you are happy with its placement,
then switch back to DESIGN VIEW and without further modification SAVE
the form - doing this will ensure that the form launches in the same
place and the same size each time it is used. This trick of viewing
the form in FORM VIEW, then switching to DESIGN VIEW and saving will
allow you to edit your form later also.
It is feasible to extend this hierarcy to provide greater functionality
and complexity. As system development progresses it is often necessary
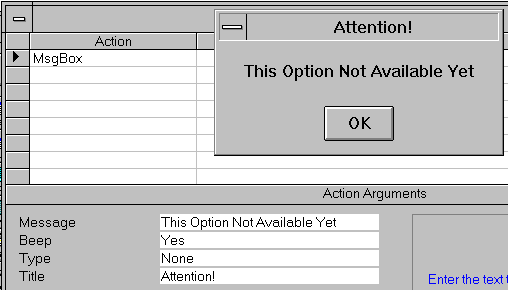
to successively provide options - by using the MSGBOX macro, it is
possible to alert users to unfininshed STUBS of the menu tree, which
can be completed and tested separately before inclusion in a growing
system.


