BACK | ![]() | MORE HTML
| MORE HTML
The World Wide Web (WWW) is a graphical face for some of the internet’s richest resources. This workshop aims to de-mystify the language of the WWW, HTML (Hyper-Text Mark-up Language), and demonstrate that anyone with access to the internet can also become a ‘content provider’ on the ‘Net simply and easily.
Resources available on the WWW are viewed via a BROWSER. Some common browsers include Netscape, Mosaic and Lynx (although the latter is text only, no graphics). Graphical browser software resides on the ‘surfers’ machine, and interpret the incoming telecommunicated bit-stream, creating WWW pages live to screen. The incoming script, as you will discover during this session, is TEXT with embedded formatting codes (TAGS) and references to other files (HREF’s and IMG’s) providing the INLINE GRAPHICS and the LINKS to other pages.
The WWW appears (at least on most ‘BROWSERS’) to be intensely graphical, in truth, much of the look and feel of the pages being viewed is composed on the fly rather than being transmitted thus. Fonts are chosen, layouts are calculated AT THE USERS END, by the browser being used. The Author has limited control over how their document will look when received, providing gross structural guidelines (ie. paragraph demarcation, titling position, emphasis etc). The browser viewing the masterpiece, and more importantly, the browsers capabilities and default settings, can drastically effect the appearance of even the most carefully formatted WWW page.
HTML can be written in any text editor, or wordprocessor capable of outputting TEXT, but is most commonly written using an HTML EDITOR. There are many such editors, HoTMetaL and Hotdog being the two I have used the most. There are also many HTML CONVERTERS that take output from wordprocessors and ‘mark it up’ into HTML - generally these require you to tidy up the text produced, and so still require you to know basic HTML structure.
Anyone familiar with basic wordprocessing, has all the pre-requisites for successful HTML creation. In a wordprocessor, for example, if you wish to BOLD a term, you turn bold on, type your text and then turn bold off. In HTML, the following sequence <B>hello</B> has the effect hello when viewed by a browser. The <B> and the </B> are called TAGS (a begin and an end, thus surrounding the text to be affected).
Marking up a document for viewing with an HTML capable browser is as simple as surrounding sections of the text with appropriate tags. To embed graphics, you merely mention their filenames in an IMG tag; to link to other documents, you merely mention the URL of the other document in an HREF tag, your browser does the rest. The document following demonstrates some of the basic HTML TAGS in-situ.
	<HTML>
	<HEAD>
	<TITLE>BOGABILLA'S HOME PAGE</TITLE>
	</HEAD>
	<BODY>
	<H1>Bogabilla State School's home Page</H1>
	<HR>
	<UL>
	<LI> Read Our School <A HREF=dev.htm>Development</A> Plan</LI>
	<LI> Look at a <A HREF=map.htm>map</A> of our School></LI>
	<LI> See who is on our <A HREF=council.htm>School Council</A></LI>
	<LI> Send us some <A HREF=mailto:me@home.au>E-Mail</A></LI>
	<LI> Jump to some neat some <I>educational</I><A HREF=edlist.htm>Stuff</A></LI><UL>
	<IMG SRC=skoolpic.gif>
	</BODY>
	</HTML>
When viewed in a browser (in this case Netscape), it looks like this:
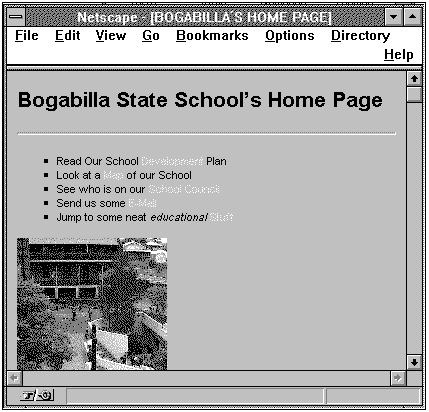
The source HTML file was created in NOTEPAD (a Windows Accessory) and consists of a number of page elements including LIST ITEMS, a TITLE, a HORIZONTAL RULE, an IMAGE, some ITALICISED TEXT and some ANCHORS (or links)
Notice that generally each of the TAGS has a begin and end (eg. <tag> and </tag>), thus providing a container for the information contained within. Exceptions to the begin..end model are standalone tags like the <HR> tag which causes the browser to generate an embossed line across the window displaying the page and the <IMG> tag.
There are a number of required elements to any HTML page, namely
HTML pages could therefore simply be structured as follows:
	<HTML>
	<HEAD><TITLE>Window Name</TITLE></HEAD>
	<BODY>body elements </BODY>
	</HTML>
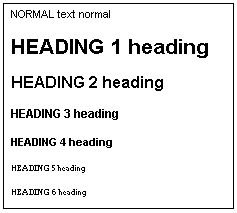
The heading tags provide you with the opportunity to include text that is bigger, relative to the base font size. It should be noted that FONT settings on the browser that is viewing the page (both base font and size) will determine the exact appearance of your headings - all you can do is specify the relative sizes of them.
To use a HEADING 1, as an example, you would enter:
<H1>The Heading</H1>
Inside the heading tags, it is possible to have other body elements, including image references and anchors. It is clear that, by about H4 you are at the same size as normal paragraph text, although it appears emphasised.
Paragraphs, as with wordprocessors, are continuous sections of text. Within paragraph tags, characters such as ENTERs and TABs are IGNORED, allowing your browser to determine how to WRAP the contained text to suit the size and shape of the viewing window.
Each new paragraph is separated from the previous by a blank line on the browser screen. Inside paragraph tags, it is permitted to place a wide range of other body elements, remembering that each of the elements will belong to the paragraph, and will be subjected to paragraph formatting.
Should you need to artificially break paragraph into sections, you can insert <BR> tags (which act like an [ENTER] key press, bringing the following text to the beginning of the next line). <BR><BR> leaves a blank line inside a paragraph. Alternatively you could declare the sections of text as separate paragraphs.
To BOLD a section of text, enclose it in <B>...</B> tags
To ITALICISE a section of text, enclose it in <I>...</I> tags
The <HR> tag causes the browser to draw an embossed line horizontally across the width of the current display window. These lines make excellent visual divisions between sections of your page, and can increase the readability of your text.
In simple terms, an unordered list is a ‘bulletted’ list, with each item appearing on a new line, bulletted by a default block character.
	<UL>
	<LI>The</LI>
	<LI>Hills</LI>
	<LI>Are</LI>
	<LI>Alive</LI>
	</UL>
when viewed by a browser looks like this:
Note that each of the list items will be indented from the surrounding text, and further indented from the bullet.
An ordered list, like an unordered list is a bulleted collection of list items. The bullet in the case of the ordered list is a sequence number.
	<OL>
	<LI>With</LI>
	<LI>The</LI>
	<LI>Sound</LI>
	<LI>Of Music</LI>
	</OL>
when viewed by a browser looks like this:
Notice that the numbering corresponds to the order of list items in the original script.
A list can contain a sub-list which can contain a sub-sub-list and so on - just be careful to fully enclose the tags of your sub-list inside the master list’s item tag. This is generally called NESTING and if done carefully can look very effective.
The WWW works under UNIX, not DOS. Unix is case sensitive, file references (and URLs) are usually entered in lower case - if you adopt this habit from day 1, then you will likely not encounter a ‘file not found’ error message.
A URL (Uniform Resource Locator) is an example of an absolute address unique for each page available on the ‘Net. An example might be:
http://www.terrace.qld.edu.au/index.htm
which refers uniquely to the index page of St. Joseph’s Web. All of its files reside on a particular computer, in a particular directories, and have a particular filenames.
When spinning your own Web, it is usual that you refer to your files with relative file references. You would typically create directories on your hard drive (or floppy) keeping like files together. An example of such a directory follows:
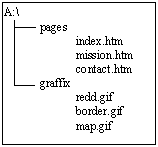
Since the disk in the A: drive contains LOCAL FILES, we can refer to the redd.gif file from within the file contact.htm with the file reference:
../graffix/redd.gif
This reference is a relative reference. To refer to the file contact.htm from the index.htm file, the relative reference:
contact.htm
is all that is needed (as they are both in the same directory).
Your Webs are spun with relative references to files you own, and absolute references to files located elsewhere on the WWW. Using this strategy, it is then easy to transfer your homespun Web onto a WWW Server (with all the directories containing support files copied intact) for release to a global audience.
From here on, we will refer to either a relative or absolute file reference as merely a fileref.
When the WWW was first specified, standards were established which determined what file formats were to be supported as native. Image files, it was decided, were to be bitmaps of either the .GIF or .JPG type.
A .GIF (Graphics Interchange Format) file is a special type of bitmap (first specified by Compuserve - I think). It differs in file format and structure from all other types of bitmap.
Should you have images in other formats, you will need to obtain an image type converter (Like Paintshop Pro for example) to change your images into either of the supported types of image. Merely renaming the file does not change it’s format!
To insert an image into your HTML document, you use an IMG tag similar to the following:
<IMG SRC=fileref>
where fileref is replaced with the file name of the image.
By default, most browsers place images on the left hand edge of the display window, separating it from surrounding text.
You can align one line of adjacent text to serve as a label for the image by adding an alignment clause to the tag like so:
<IMG ALIGN=placement SRC=fileref>
where placement of adjacent label text can be:

An <IMG> tag is an instruction to your Browser, telling it to try to download a file with the specified fileref. If it successfully downloads the image, it will display it on the screen as a page element (if your browser is able to display images). If, there were problems and the download is unsuccessful, you will get a question mark icon if there is no file of that name present in the specified directory, or a broken image icon if the file was there but there were problems interpreting or downloading it.
Anchors in an HTML document are the LINKS to other files that make point-and-click navigation so easy on the WWW.
Typically, anchors contain HREFs (Hyper-text References), and may also contain <IMG> tags relating to icons also. A typical Anchor takes the following form:
<A HREF=fileref>Anchor Text and or IMG tag</A>
A simple example (taken from the Bogabilla Home Page discussed earlier) could be:
<LI>See who is on our <A HREF="council.htm"> School Council</A></LI>
where School Council is the Anchor Text and council.htm is the file that will be jumped to. By including an IMG tag, we can create a clickable icon to accompany the anchor text:
<A HREF=home.htm><IMG ALIGN=MIDDLE SRC=home.gif>Go Home</A>
In the above anchor, home.htm is the file that is being jumped to, home.gif is a clickable icon to do the jump and Go Home is highlighted text that also provides a link to home.htm.
Note that the successful operation of the above anchor line relies on the presence of 2 files: home.htm and home.gif, both of which must be located in the same directory as the file that contains this link.
Should you want to provide a link to other WWW resources, then the fileref needs to contain the whole URL, like so:
	<UL>
	<LI><A HREF=http://www.uq.oz.au/~zzgttcc1/terrace.htm>Terrace Home Page</A></LI>
	<LI><A HREF=http://www.csiro.au>CSIRO</A></LI>
	<LI><A HREF=http://www.yahoo.com>Yahoo’s List Of Lists</A></LI>
	</UL>
which could be a list of your favourite WWW sites.
There are, as I see it, only a few rules that you need to follow when planning your own webs:
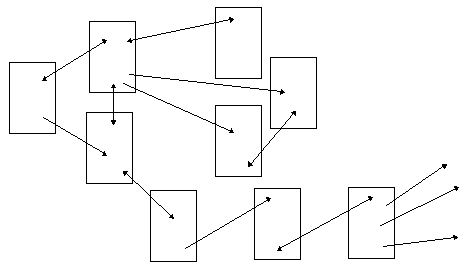
A carefully woven web is usually non-linear in nature, and encourages the user to determine what they want to see.
You may find it useful to design a TEMPLATE for your pages, with headings, lines and navigation anchors pre-placed. This template can then be copied as many times as you need pages, then customised to suit the purpose of the page.
It is preferred practise to provide navigation anchors both TO and FROM each page. It is bad form to force users to use a browsers BACK button to get away from a page.
Avoid using EXCESSIVE use of images, particularly large images that take a long time to download. Remember, your pages may be viewed by OTHER BROWSERS, or worse still, by Lynx (a text only www client).
Follows are a few really helpful URLs that will give you a starter into the WWW of HTML authorage
BACK |  | MORE HTML
pwhitehouse@optushome.com.au
(c)w2k
![]()