421: Asiatic Elephant

I have folded a few elephants – most concentrate on the head and ignore the rest of the animal – not so this little beauty:

This model has much solidity about it. It looks like it has bulk yet uses little paper to do this, an interesting haunch locking mechanism and a tight little bottom (ahem).

Taken from Works of Satoshi Kamiya Volume 2, this is the most elephantine figure I have yet folded and uses some lovely techniques to use the paper very efficiently, yet result in a free-standing, locked model.

The hind quarters, particularly, are well formed, with a cutesy tail and toe nails and all – very nice Mr Kamiya.

I think this model would work on a much bigger scale – maybe when a sufficiently large sheet avails itself I might give it a go.

I am enjoying working up to some of the more challenging folds in this book – some are just plain bewildering to me at the moment but that confusion too shall pass eventually I hope.

420: Kamiya’s Diamond

I have been exploring folded regular polyhedra, but came across this, a brilliant cut faceted diamond by Satoshi Kamiya and thought I would give it a go:

As a first fold, this is pretty sloppy to be honest – only after finishing it did the geometry I was laying down in pre-creases make sense. I have no doubt that when i re-fold this it will be much nicer.

This fold is a very clever bit of geometry, based on an octagonal piece of paper, making many facets and that classic jewellery diamond shape (this one would be a few hundret carats at that). The top face facets are locked in place by tiny closed sinks (making this very difficult I suspect to fold really small).

It is a pity there is no real locking mechanism to keep the model closed (I cheated and used a little sticky tape) – the bulk of paper does swirl in place but tends to spread when left – this might be different if made with a foil paper.

I seem to be folding a bunch of Kamiya models at the moment – prolly inspired by my latest Origami book purchase

419: Green Tree Snake Form

I was leafing through my latest Tanteidan Magazing (Japan Origami Society journal) and came across a layer management exercise by Hideo Komatsu:

Having bought a pack of 2-colour (different colour front and back) paper, some green/brown, I was looking for something to try it out on.

This is slightly complicated, but ends up looking a little like a little snake curling back on itself a couple of times – layer management and colour changes mean the snake and it’s background are fairly distinct.

Hideo has many other models, I like the strong style, heavy abstraction and interesting sheet management evident in his work (having a few in the 365+ collection already) – I must track down more of his work.

418: Kamiya’s Golden Retriever

As soon as I knew Satoshi was due to release a new book, I knew I had to have it:

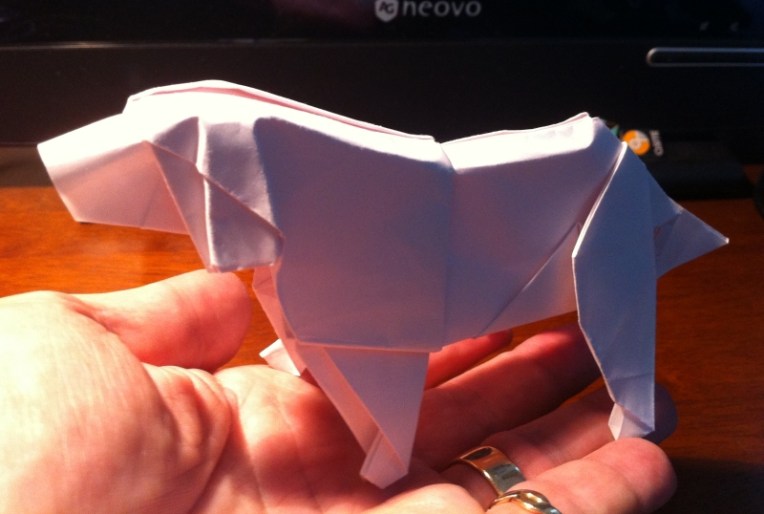
This is the first fold of my first model from “The Works of Satoshi Kamiya 2”, and it is quite recognisably a Golden retriever/labrador. 

For anyone who has been blessed with a lab in their life, you realise how wonderfully gentle, soppy, stupid and plain lovely they are.

This model is dedicated to the memory of “Missy” and “Raffy” – two much missed pets (one of my in-laws, the other a mates family pet).

I love how this model is demonstrative of form without necessarily capturing every detail. The fold technique is odd, but interesting and each time I wrangle the head/shoulders, you get a slightly different aspect, expression and posture – lovely use of a sheet.

I used lithography paper for this, but have also folded it with a piece of double-sided kami, with good results.  I think I like the white fold, however sandy/buff would be more demonstrative of the actual dog’s colour.

This is the first, of a series, taken from this wonderful book – some serious challenges ahead – bring it on!

417: Ornament

I had a need, my brain was fried but I had to keep busy sooo…

I was given some lovely Yuzen squares (15cm) and, because the papers well all different, so colourful I decided to try to fold, from memory the Jackstone – unsure if my fat clumsy fingers could manage the fold so tiny.

I managed a dozen of them before the cramps and RSI flared up again. The resultant 6 pointed stars are so lovely, I threaded them on gold thread and gifted them to friends to put on their christmas tree (I do hope they like them).

When my hands settle down I might make some more – mind you it helps to have good paper.

416: Dark Rider

Round the corner came a black horse, no hobbit-pony but a full-sized horse; and on it sat a large man, who seemed to crouch in the saddle, wrapped in a great black cloak and hood, so that only his boots in the high stirrups showed below; his face was shadowed and invisible.
“When it reached the tree and was level with Frodo the horse stopped. The riding figure sat quite still with its head bowed, as if listening. From inside the hood came a noise as of someone sniffing to catch an elusive scent; the head turned from side to side of the road.” – “Three is Company,” Fellowship of the Ring, p. 84

I hate it when things beat me – I find it really hard to let it go:

On my FOURTH attempt, I managed to fold Jason Ku’s amazing model of a Dark Rider (version 8.1) – another character/thing from Lord of the Rings. This is getting to be a habit but is part of the build up to the release of the first part of “The Hobbit”, and I am a bit of a fan.

This fold took me an age (about 6 hours of actual folding) – determined to be accurate, take my time and complete each step as neatly as I could, this strategy paid off through stonkingly complicated twists, crimps and spread-squashes as you coax a square of paper into a possessed horse with a robed rider.

I am particularly proud of the hands/gauntlets – my variation on Jason Ku’s design, I think it looks better. there is so much to see in this model that it is difficult to photograph it and do it justice.

A huge piece of Kraft paper (60cm square) results in a decent sized model (14cm at its tallest) with amazing detail. My only criticism I guess is the flimsiness of the front legs – completely unable to support the bulk of paper above.

I mounted this model on a simple wire armature, so it can stand – he sinisterly looks like he is reaching for something (the one ring, naturally) and I like that the robes look full but are empty.

I masterpiece in design, there were many times I just had to walk away, unable to fathom what the next step meant or how I was going to achieve it. Kraft paper is remarkably forgiving and there was nearly no paper fatigue near the end. Not sure how you could actually fold this model with thicker paper as the centre gets very dense and shaping requires you to wrangle upwards of 20 layers.

I am totally chuffed to have achieved this, my first successful fold after so many failures – one I even had the paper disintegrate in my hands due to fatigue. I found myself having to look forward to how the manoeuvre looks when done to work out some of the ore complex swivels, reverses and open sinks.

As awesome as this model is, this design is NOT a beginners model – the instructions need interpretation as many steps require many new folds to happen at the same time (some without reference).  Indeed I look at my first successful attempt and notice a bunch of things I will do differently next time I fold it.

No idea what I will do with this model, but I am pleased I can now mentally tick this one off in my folders bucket list.

415: Smaug the Golden

I have been looking for a nice dragon, you know, in celebration of the forthcoming release of “The Hobbit” (being a bit of a fan):

I saw a coloured/cut version of this dragon on Deviantart and thought it worth trying, turns out it is a WIP from Tadashi Mori, who released a video of how to fold it so I was away.

It reminds me a little of the “Ancient Dragon” by Satoshi Kamiya, but is much easier to fold and is a lot less brutal to the paper.

I can see huge modelling potential for this dragon, Tadashi calls it a “darkness Dragon” and I hope he is continuing the development of the model. I added knees, claws and modified the wings slightly so they stay out in display.

I like the tail and general morphology of this dragon – the central body length (betwixt fore and aft legs is a little compact, neck a little long and hind legs a little bunched but it is a nice fold none the less.

I am very happy with this as a first fold, and will probably fold it again. I used 55cm square Kraft paper and it seemed to hold up pretty well.

Soooo … who would like this little beauty? He needs a home, is only a little bit bitey but 100% dragon (well, 74% dragon, 26% paper, but with imagination…)

edit: smaug long since found a home, sorry

414: Sopwith Camel

I have been asked many times by well-meaning people whether I can make paper air planes:

The honest answer is “sort of” – I love fantastically complicated and detailed Origami models of actual planes, but cannot make one that can fly for shit.

This little beauty was a right bastard of a fold but closely resembles, at least in intent, the Sopwith Camel – a famous dogfighter in WWI. A fantastically detailed little model with propellor, machine gun, pilot, landing deat abd a lovely set of supported twin-wings.

Designed ingeniously by Jose Maria Chaquet from a bird-base within a bird-base, I mis-judged how dense the paper would become and started with too smaller a square I think – 40cm was not big enough, but still, battled on with the Kraft paper and think the end result is pretty nice for a first fold.

If I were to fold this again, I think 50-60cm would make the final modelling easier. As the fuselage is so dense I had to “cheat” and use some small bits of double-sided tape to hold it together and stop it unfolding itself in the humidity but I will not tell anyone if you do not.

Membership

I have been toying with the idea of membership of BOS (British Origami Society) and JOS (Japanese Origami Society) for ages now and then along came “Fathers Day”:

The kids shouted membership so now I guess it gets official.

Membership is important, I just wish I could join an Australian Society but sadly, there is none. Membership brings official magazines (JOAS Taintedan is mostly in Japanese which makes things difficult) and news from like-minded folders which is a good thing.

My next level-up as a folding geek is to attend conventions I guess – one day perhaps

413: Satoshi’s Minotaur

Determined to try something harder, I had flagged satoshi Kamiya’s Minotaur a “must try eventually”:

I also wanted to try my new “envelopener” – an ingenius paper cutter from The Origami Shop that splits a page on a crease – being frustrated at not being able to cut a straight edge easily on large format paper.

This lovely mythical beast is part man part bull but Satoshi takes this to a new level, making the man beastly as well.

So much paper is worked here, starting with nearly a metre square, the resultant model is barely 15cm tall and so dense in places that detailing was very difficult. I love the expression of his face, the arms and hands, hooves and fantastic tail.

Such innovative use of the sheet, you do not realise that the arms end up being about 30+ layers thick. I have seen this model folded by others and it was standing – mine, made from 35GSM brown Kraft paper does not (without the assistance of a wider armature stand I made for him)

As a first fold, I am very pleased with how he turned out – I might fold him again, one day, as I learned a lot from this fold.

412: Satoshi’s Coelophysis

I have many designs for dinosaurs, few more elegant that the Coelophysis designed by Satoshi Kamiya

This raptor has a marvellous stance, gracious body proportions and a menacing appearance – quite a feat given it started as a square cut from A3 copy paper.

A very well designed model indeed, quite dense in places but very economical with paper, I like this chap a lot – it was a good challenge. At this scale it is more like a Compsognathus.

I had forgotten how much fun Satoshi’s models were to fold, must try something harder.


411: Phizz-based Stellated Icosahedron

The “phizz” unit designed by Tom Hull is a basic building block that can be used for many modulars:

I thought I would start manageable, so devised a 30 unit ball, 6 faces each of 5 colours – total of 30 units. These are easy folding and have a positive locking mechanism so were a good choice.

The tricksey part was to ensure an even colour balance – making sure that no face has the same colour twice. that did my head in a little, and it seemd to take me ages to come up with a construction method where I could easily predict what colour next to use.

In the end, a lovely modular – I may try for something grander, we shall see.

401: Double-Star Flexi-Cube

It took me ages to even understand what this model was:

An ingenious design by David Brill, modular in construction composed of 3 different types of modules, clustered in threes, hinged together, it is a most perplexing construction.

A seemingly plain cube opens up to show a star, which fits wholly within the cube and is removable.

Flexing the cube makes another star, flexing the star makes a plank, stellated plain and other interesting twisted geometries.

This is a keeper – paper tension keeps it in shape generally but it does not strongly lock, so I may resort to cello-tape on the joints so it can be handled without risk of it disintegrating (as it did to me twice).

The geometry is interesting, photographing it seems not to do justice to the shapes but I am glad I finally nutted it out – bravo Mr Brill.

409: Wedding Blossoms

A little over a year ago, my daughter as part of the very early planning stages for her wedding asked (in only the way a daughter can) if we could do something different with the flowers:

After much looking around, experimentation and reject schemes we came up with a 5-sheet rose (4 2×1 rectangles for the petals and 1 square for the calyx) secured by wire to make pose-able stems. We have folded for a year, making hundreds of blooms, to be deployed in each of the floral components of the ceremony and reception.

Bouquets

The original idea was to create enough flowers so the bouquet was a little wider than a hemisphere – each containing 3½-4 dozen roses based on 2 colour schemes: the bride wanted dark blue with occasional white blooms, the bridesmaids were predominantly white with occasional sky-blue blooms.

After the roses were stemmed and calyxed, the were wrangled into bunches, stems bent equidistant from the bud to later help in the whole ball effect.

We then bound the wire in white gaffer tape to form a preliminary handle and the tweaked the flowers to be evenly distributed and ball-shaped. On the evening before the wedding we added baby’s breath (gypsophylla) and a sheath of spathyphyllum and bound them with florists green tape (a goopy, stretchy stuff that sticks on contact).

The morning of the wedding I then frapped (macramé term) the handles with white ribbon, trimmed the tail and they were done

– every bit as lovely as I had imagined them, perfect foil to the lovely bridal party.

Buttonholes

Grooms-men, parents and siblings needed a buttonhole – single bloom, amidst baby’s breath, atop a sprig of asparagus fern from the garden.

The scheme was simple – powder blue for the grooms-men to match the bridesmaids bouquets, white for parents and siblings.

We wrapped them with florists tape to store-bought brooch pins, presto, done

– quite smart I think and a nice tie in to the rest of the floral theme.

Table Decorations

To tie in the floral accents, we decided to do something with flowers on the tables, containing all the colours we used (3 shades of blue and white).

Originally it was going to be just a sheath or arrangement, but the bride to be found candle holders so I found wicker rings that encircled those, then we made circular wreaths of randomly scattered blooms.

The day before the reception, we added baby’s breath and twigs off our needed to be pruned miniature camellia from the garden, creating lush and beautiful garlands which, when the candles were lit were really magical. I was a little concerned that the waterproofing spray (a plasticiser I thought might be necessary to stop moisture making the petals droop) would increase the flammability but all was safe in the end.

Guest Gifts

We wanted each guest to leave with a little of the floral loveliness, and also tie in who was at what table, where.

We hatched a plan to make a bloom for everyone, attached an embossed leaf to each (bone-folder to impress “veins”) and hand-written names for all invited guests.

Those that could not make it will receive their blooms via some other means – nice memento of what was a lovely wedding.

408: Buckbeak the Hippogriff

I will say it, I am an out and proud Harry Potter fan. Amongst the fantastical beasts that exist in the potterverse is a Hippogriff:

Manuel Sirgo is a talented designer and this is a masterful use of (an albeit fraking huge bit) paper.

I am so glad I started large (45cmsquare brown kraft) as some of the wrangling to make the head and feet was pretty intense.

This odd critter is part “griffin” part horse – claws at the front, hooves at the rear, wings and a bird-like head – weirdly wonderful.

I like that the paper is so dense it ends up being free-standing, the wings spread majestically and I am pretty happy with my first fold of it. More importantly, I learned a new trick to spread/stretch and twist stickey-outey bits to get more paper for a hood/hand which will be handy for making other models more details I suspect.