418: Kamiya’s Golden Retriever

As soon as I knew Satoshi was due to release a new book, I knew I had to have it:

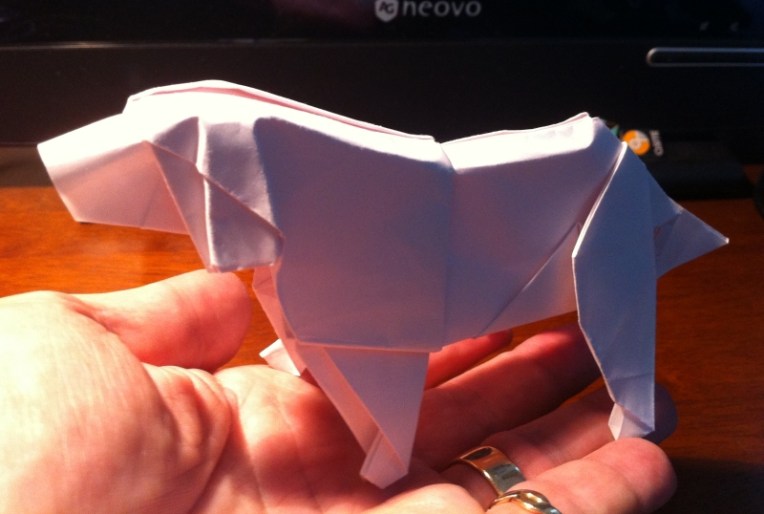
This is the first fold of my first model from “The Works of Satoshi Kamiya 2”, and it is quite recognisably a Golden retriever/labrador. 

For anyone who has been blessed with a lab in their life, you realise how wonderfully gentle, soppy, stupid and plain lovely they are.

This model is dedicated to the memory of “Missy” and “Raffy” – two much missed pets (one of my in-laws, the other a mates family pet).

I love how this model is demonstrative of form without necessarily capturing every detail. The fold technique is odd, but interesting and each time I wrangle the head/shoulders, you get a slightly different aspect, expression and posture – lovely use of a sheet.

I used lithography paper for this, but have also folded it with a piece of double-sided kami, with good results.  I think I like the white fold, however sandy/buff would be more demonstrative of the actual dog’s colour.

This is the first, of a series, taken from this wonderful book – some serious challenges ahead – bring it on!

417: Ornament

I had a need, my brain was fried but I had to keep busy sooo…

I was given some lovely Yuzen squares (15cm) and, because the papers well all different, so colourful I decided to try to fold, from memory the Jackstone – unsure if my fat clumsy fingers could manage the fold so tiny.

I managed a dozen of them before the cramps and RSI flared up again. The resultant 6 pointed stars are so lovely, I threaded them on gold thread and gifted them to friends to put on their christmas tree (I do hope they like them).

When my hands settle down I might make some more – mind you it helps to have good paper.

416: Dark Rider

Round the corner came a black horse, no hobbit-pony but a full-sized horse; and on it sat a large man, who seemed to crouch in the saddle, wrapped in a great black cloak and hood, so that only his boots in the high stirrups showed below; his face was shadowed and invisible.
“When it reached the tree and was level with Frodo the horse stopped. The riding figure sat quite still with its head bowed, as if listening. From inside the hood came a noise as of someone sniffing to catch an elusive scent; the head turned from side to side of the road.” – “Three is Company,” Fellowship of the Ring, p. 84

I hate it when things beat me – I find it really hard to let it go:

On my FOURTH attempt, I managed to fold Jason Ku’s amazing model of a Dark Rider (version 8.1) – another character/thing from Lord of the Rings. This is getting to be a habit but is part of the build up to the release of the first part of “The Hobbit”, and I am a bit of a fan.

This fold took me an age (about 6 hours of actual folding) – determined to be accurate, take my time and complete each step as neatly as I could, this strategy paid off through stonkingly complicated twists, crimps and spread-squashes as you coax a square of paper into a possessed horse with a robed rider.

I am particularly proud of the hands/gauntlets – my variation on Jason Ku’s design, I think it looks better. there is so much to see in this model that it is difficult to photograph it and do it justice.

A huge piece of Kraft paper (60cm square) results in a decent sized model (14cm at its tallest) with amazing detail. My only criticism I guess is the flimsiness of the front legs – completely unable to support the bulk of paper above.

I mounted this model on a simple wire armature, so it can stand – he sinisterly looks like he is reaching for something (the one ring, naturally) and I like that the robes look full but are empty.

I masterpiece in design, there were many times I just had to walk away, unable to fathom what the next step meant or how I was going to achieve it. Kraft paper is remarkably forgiving and there was nearly no paper fatigue near the end. Not sure how you could actually fold this model with thicker paper as the centre gets very dense and shaping requires you to wrangle upwards of 20 layers.

I am totally chuffed to have achieved this, my first successful fold after so many failures – one I even had the paper disintegrate in my hands due to fatigue. I found myself having to look forward to how the manoeuvre looks when done to work out some of the ore complex swivels, reverses and open sinks.

As awesome as this model is, this design is NOT a beginners model – the instructions need interpretation as many steps require many new folds to happen at the same time (some without reference).  Indeed I look at my first successful attempt and notice a bunch of things I will do differently next time I fold it.

No idea what I will do with this model, but I am pleased I can now mentally tick this one off in my folders bucket list.

415: Smaug the Golden

I have been looking for a nice dragon, you know, in celebration of the forthcoming release of “The Hobbit” (being a bit of a fan):

I saw a coloured/cut version of this dragon on Deviantart and thought it worth trying, turns out it is a WIP from Tadashi Mori, who released a video of how to fold it so I was away.

It reminds me a little of the “Ancient Dragon” by Satoshi Kamiya, but is much easier to fold and is a lot less brutal to the paper.

I can see huge modelling potential for this dragon, Tadashi calls it a “darkness Dragon” and I hope he is continuing the development of the model. I added knees, claws and modified the wings slightly so they stay out in display.

I like the tail and general morphology of this dragon – the central body length (betwixt fore and aft legs is a little compact, neck a little long and hind legs a little bunched but it is a nice fold none the less.

I am very happy with this as a first fold, and will probably fold it again. I used 55cm square Kraft paper and it seemed to hold up pretty well.

Soooo … who would like this little beauty? He needs a home, is only a little bit bitey but 100% dragon (well, 74% dragon, 26% paper, but with imagination…)

edit: smaug long since found a home, sorry

414: Sopwith Camel

I have been asked many times by well-meaning people whether I can make paper air planes:

The honest answer is “sort of” – I love fantastically complicated and detailed Origami models of actual planes, but cannot make one that can fly for shit.

This little beauty was a right bastard of a fold but closely resembles, at least in intent, the Sopwith Camel – a famous dogfighter in WWI. A fantastically detailed little model with propellor, machine gun, pilot, landing deat abd a lovely set of supported twin-wings.

Designed ingeniously by Jose Maria Chaquet from a bird-base within a bird-base, I mis-judged how dense the paper would become and started with too smaller a square I think – 40cm was not big enough, but still, battled on with the Kraft paper and think the end result is pretty nice for a first fold.

If I were to fold this again, I think 50-60cm would make the final modelling easier. As the fuselage is so dense I had to “cheat” and use some small bits of double-sided tape to hold it together and stop it unfolding itself in the humidity but I will not tell anyone if you do not.

413: Satoshi’s Minotaur

Determined to try something harder, I had flagged satoshi Kamiya’s Minotaur a “must try eventually”:

I also wanted to try my new “envelopener” – an ingenius paper cutter from The Origami Shop that splits a page on a crease – being frustrated at not being able to cut a straight edge easily on large format paper.

This lovely mythical beast is part man part bull but Satoshi takes this to a new level, making the man beastly as well.

So much paper is worked here, starting with nearly a metre square, the resultant model is barely 15cm tall and so dense in places that detailing was very difficult. I love the expression of his face, the arms and hands, hooves and fantastic tail.

Such innovative use of the sheet, you do not realise that the arms end up being about 30+ layers thick. I have seen this model folded by others and it was standing – mine, made from 35GSM brown Kraft paper does not (without the assistance of a wider armature stand I made for him)

As a first fold, I am very pleased with how he turned out – I might fold him again, one day, as I learned a lot from this fold.

412: Satoshi’s Coelophysis

I have many designs for dinosaurs, few more elegant that the Coelophysis designed by Satoshi Kamiya

This raptor has a marvellous stance, gracious body proportions and a menacing appearance – quite a feat given it started as a square cut from A3 copy paper.

A very well designed model indeed, quite dense in places but very economical with paper, I like this chap a lot – it was a good challenge. At this scale it is more like a Compsognathus.

I had forgotten how much fun Satoshi’s models were to fold, must try something harder.


408: Buckbeak the Hippogriff

I will say it, I am an out and proud Harry Potter fan. Amongst the fantastical beasts that exist in the potterverse is a Hippogriff:

Manuel Sirgo is a talented designer and this is a masterful use of (an albeit fraking huge bit) paper.

I am so glad I started large (45cmsquare brown kraft) as some of the wrangling to make the head and feet was pretty intense.

This odd critter is part “griffin” part horse – claws at the front, hooves at the rear, wings and a bird-like head – weirdly wonderful.

I like that the paper is so dense it ends up being free-standing, the wings spread majestically and I am pretty happy with my first fold of it. More importantly, I learned a new trick to spread/stretch and twist stickey-outey bits to get more paper for a hood/hand which will be handy for making other models more details I suspect.

407: Chan’s One-Sheet Rose

Browsing Origami Tanteidan 12th Convention, I noticed a seemingly impossible fold:

Brian Chan is an amazing designer (Attack of the Kraken is one of his) and this flower is an ingenious, if intense, use fo a coloured square of paper.

If the paper was coloured green one side, red the other, then the way this design turns out the green bits of the flower and the red petals sort themselves out appropriately – amazing.

I only had some glossy red (a cheapo pack of coloured origami paper that loses colour all over your fingers) but persevered with it, despite the mess and the tiny size.

I still have to master the flower shaping, it sort of looks correct (and I have no doubt if i wet-folded or used methyl cellulose I could mould it more naturally , but I am happy I have got the hang of the fold. 

I used a 25cm red/white square and that is hard work – some of the accordion pleats are tiny, but it worked out ok. My second fold was a 45cm brown kraft fold that was easier to complete.

Interestingly, the box-pleating technique to raise the leaf is similar to the “dollar flower” I have been folding from the cut-offs from A3 squares, so found that part of the model really easy. The technique of raising the colour-changed petals for the rosebud is ingenius.

405: No Bull

When I first saw pictures of this Bull, I knew I wanted to try to make it:

I love the pose, the power, the majestic playfulness of this, a proud bull.

There are many junctures in this fold where there are no landmarks, you guess places of folds so this, my first fold, is lucky to look even vaguely bull-like. I will fold this model again, I want to try to fold this from memory. Continue reading

401: Spike the Echidna

Ladies and Gentleffolke, may I introduce to you Ms Thelma Tiggywinkle – Eric Joisel’s Adult Echidna: 20120817-163036.jpg

I had folded Eric Joisel’s “Baby Hedgehog” early last year and noticed as part of the instructions that a scaled up version (9 ranks of quills instead of 5, based on 32ths instead of 16ths) would result in a “mother” and he was right – what a mofo of a fold, honestly!

Starting on Friday evening with a 60cm square of brown Kraft paper, I started pre-creasing – dividing up into 32nds vertically and horizontally, then diagonal creasing to create hex-grids which ended up tiny.

I had long been fascinated with the process of forming the quills – crease-crimp/collapse diamonds and then making a zig-zag trough beside one row to raise the next results in lovely paper geometry both on the outside and the underside,

After over an hour each rank of spines, the resultant paper is box-pleated into legs and the ends inside-reverse folded into toes.

The ranks are then teased out to form tail and face – a lovely fold that is soooo very cute although it is punishingly time-consuming.

Very satisfying – folds ONLY, no cuts, no glue, she needs some “wet folding” shaping but she is already very echidna-like. No idea what we will do with her, but for now she is snuffling around our house. Hope you enjoyed the journey as it played out on facebook.

399: Golden Snitch

Exploring an Origami Tanteidan Convention book I came upon a model designed by Peter Farina I just had to try:

Being an out and proud Harry Potter fan, I know that the golden snitch is an essential component of any game of Quidditch, this one is a beauty.

Essentially using overlaying fan-pleats, you create the wings and enough paper to tease and shape round to make the body. Initially, my test fold was done in white paper and I found I had to be very careful (copy paper is so brittle) not to tear/split it – the middle section gets really damaged. Continue reading

398: Los Hombre

I have been exploring the wonderful work of Victor Coeurjoly, in particular his human figure (hombres) work which is very distinctive.

I came upon a crease pattern in his Flickr stream and knew I had to try it. I have been exploring these guides more and more as I find super complex models exist only in this form sometimes – doing the whole instruction/diagram sequence is hard work if you are busy and creative:

I am pretty sure he uses tissue foil (really thin, metallic-backed paper) and methyl cellulose (an “acceptable” paper stiffener and setting agent) to keep the limbs thin and posed but the style is amazing.

I set about using normal paper, failed miserable because there are 4 places where the creases become so intense that the paper just disintegrated. I tried a chunk of litho paper and it was better (if a bit thick to do the final limb and torso modelling, but demonstrative of form none the less. Continue reading

391: Pierre Mâché en Francais

….Puis je vous présenter Monsier Pierre Mâché, my first internationally folded gnome:

20120422-101343.jpg
You see, we are currently in Paris, on a vacation that has been in the planning stages for years, and we had an astonishing meal at a local restaurant Les Enfants Perdus, and I noticed they topped their tables with a square of sueded cream colored paper.

20120422-163405.jpg
In my best French, I asked pour Le paper sur la table and they gave me a fresh one to fold. The paper was stiff but really strong, so I was able to model this guy a lot more than I usually can, or maybe I am just getting better.

20120422-101808.jpg
I like how his posture worked out, he definitely looks French and is gesturing as if to express exasperation that he cannot understand us odd Australians, we get that a lot.

20120422-101932.jpg
We will leave him as a gift to our hosts here in Paris, the apartment we have rented from them is wonderful, very well appointed, comfortable and essential to us keeping going each busy day.

Au revoir Paris, our first visit has been magical

20120422-102137.jpg

390: Flying wallaby

As a travelling Australian, the “flying kangaroo” is something I wish I could afford to travel using, but we are using the the “flying wallaby”:

I decided that trying to memorise a kangaroo fold would be a good idea for an aussie abroad, and what better than the kangaroo by Robert Lang from the book “Origami Zoo”.

On making, then re-making it I am convinced that this model is much more like a wallaby than a roo, but it is a lovely form none the less.

I can now fold this from memory, but it is very dense and requires thin paper else it gets bunchy early. Will practise it and hopefully, leave a stream of them all over Europe.