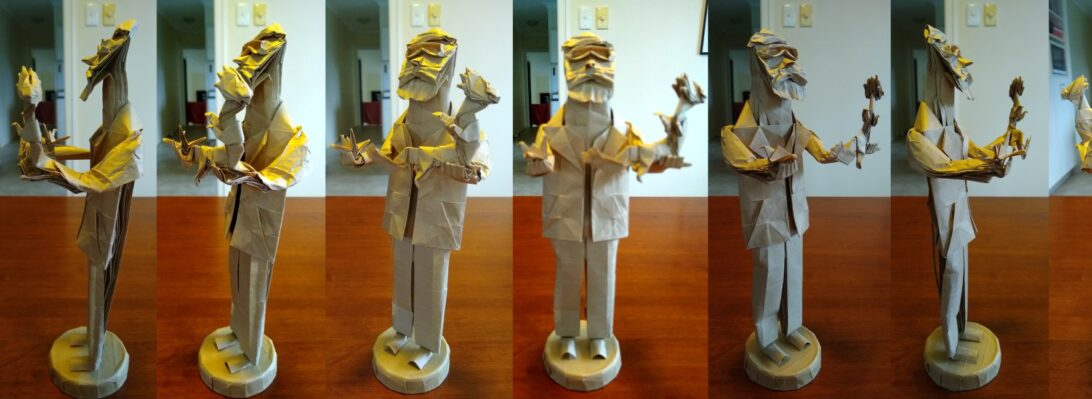
Ok boys, girls and small green aliens from alpha centauri, I present to you clues for this week’s WTF (What’s That Fold?) also model #434
I start with an enormous square (using a square cut from an a1 ish sheet of litho, no idea if it should be nice side up or down so I just guessed. Using the ourPAD as the repository of instructions and not yet known if I will need anything from my origami toolbox:
Those of you who were guessers for the WTF (What’s That Fold?) #4 will be interested to know that this model was actually a Spider Conch designed by Robert Lang:
I once taught on Palm Island – which is seaward from Townsville, North Queensland. Whilst there I loved to snorkel the reef nearby. Whilst doing so, I managed to find a pair of “spider shells” that I still have today.
Ok kids, this week’s WTF (What’s That Fold?) #4 is a doozie, it is from a fairly old publication and is NOT land-based (that is what is called a hint people).
You may have guessed I am a bit of a fanboi when it comes to the works of Satoshi Kamiya:
As previously stated, my wife and I spent some time in a rainforest cabin and that inspired me to have a go at his Lyrbird – a deliciously complicated crumple that needs to result in a characteristic fan tail, 2 side tail things, wings, legs, body and head.
My wife and I spent some time in a rainforest cabin – whilst there I folded this week’s WTF#3:
On a tropical theme, I left the model for the cabin owner as a thank you for a lovely time away.
A simple, slightly asymmetric fold that teases an odd number of petals, stamen and stem, cleverly managing the layers so the flower face and stamen would be one colour, stem another if I used duo paper.
I was looking for a simple fold and amongst my Tanteidan magazines I spied this figure, designed by Yamaguchi Makoto – must try it with colourful paper.
No one was able to discern it was even a flower – very disappointing people!
Anyone who knows me realises I am a huge fan of the Alien movies, the first one is, for me, close to perfect science fiction horror:
I had been aware of Kade Chan’s Alien design for ages, had the crease pattern and wrestled many times trying to make it with no luck. I had relegated this to the “give up on it” pile – there are a few that have just beaten me for the moment.
Kade posted a near complete video tutorial, suddenly this model was back on the radar. The video is pretty clear – you should have a go – it is NOT a beginners model but the techniques for forming the main features are pretty clear.
So I set about a test fold, in Litho paper – the paper gave up half way through, splitting on most major creases, but I learned the basic collapse and some of the featuring before it gave up so resolved to fold it with something more durable.
I cut a 55cm square of Kraft paper off the roll and, very carefully, began folding. This, like most models, relies on accuracy for things to work out – a part of a mm out here and it compounds when you do accordion pleating, and this model has so many layers because of the amount of the sheet that is hidden.
I like that most surfaces provide layers that you can then texture in the modelling, sculpting them in graded steps to create carapace, armour and small beautiful details like the rib cage and prehensile tail.
The alien as envisaged by the movie franchise took on shape and general morphology from the host it bursts through the chest of – this one is fairly certainly humanoid and so posing it I found myself anthropomorphising its stance a little. I used a little MC to ensure the pose was rigid, clamped details in place until the paper was dry, then mounted him on a textured circular base and am quite chuffed with the result.
This was WTF (What’s That Fold) #2 – stay tuned for more paper bending
So, last week’s fold became obvious, I gave LOTS of clues and many guessed not only what the model was but also the designer and the book it features in – nice work.
On a different tack this week, I present the first clue in WTF#2:
Take guesses as to what this will become (assuming I can achieve the model and it does not end up a scrunched up mess in the bin).
Depending on how it turns out, you can win either this actual model or a refold of it (the refold will be tidier I suspect).
Thinking caps on, suggest away (and expect less clues this time)
After Step 25, the model looks like this:
And a little later, it looks like this:
After a LOT of open/close sinks, it looks like this:
And with some nifty wrangling, it looks like this:
Follow that up with some shaping and modelling and you have this:
A critter only a mother could love – a Xenomorph that is fairly faithful to the HR Geiger original – Alien, designed by Kade Chan and wrangled to it’s final shape by me.
I have yet to apply MC to stabilise and pose this chap, but already I like him a lot – the paper is so very thick in many places (my prototype fold actually disintegrated in my hands as I was folding it – litho paper fell apart at important creases) – I had to get creative with the shaping as, although the video instructions are great at getting the base, the modelling and shaping is not covered well at all.
The Weekly WTF#1 (what’s that fold) had to be a Satoshi model, and I had been itching to make this little beauty ever since I was aware he had designed one:
Initially, I folded this with a odd end of a kraft roll, starting with a nearly 40cm square (nearly in that I discovered it was not quite square), but found it very small for my fat clumsy fingers.
I resolved to fold it neater, so went larger – second fold (the one pictured) is a 60cm square of brown Kraft paper (no, it is not green, and I know of no easy way to make it so).
There is a LOT to like about this model, and some concerns – some of the steps are fairly poorly explained (given the nature of some of the manoeuvres I can not imagine how that would be improved) and some of the folding is through so many layers that without help this model does NOT stay as folded.
I decided to do wet-folding, with a little MC (methyl cellulose) to fold, mould and let it dry before moving on – this lengthened the time to make the model, but in the end made it most beautiful. Some of the subtle shaping would ONLY be achievable with foil-core paper or via wet MC folding.
In the end, this is the most frog-like thing I have encountered that was not actually a frog. the details are astonishing even to me (and I wrangled them out of a flat, uncut square).
I ended up with 2 – my first fold, whilst smaller is different to the larger one, they both have interesting postures and attitudes and I am torn as to which one I prefer.
I am sure I will fold this one again – he is so cute, but I think I will wait until I have suitable thin green paper – the model is so well designed that it’s tummy is one colour, rest of the body is the other – so I will be hunting paper that is 2 shades of green front to back (or perhaps making a bit of double tissue – we shall see).
Looking for something festive, inspired by “Robbie the Reindeer” on the telly, I decided to fold this challenging model by Robert Lang:
Masterpiece of design, I had to measure 13 landmarks (by scaling measurements based on 70ths) and then I folded triangles subdividing the surface, using those landmarks as vertices. Then you bisect every angle in each triangle and that gives you the folds for the base.
After a collapse from hell, and some clever manipulation. accordion folds and sinks to raise the points on the antlers, some shaping and a good measure of swearing, you end up with this magnificent beast.
I love Lang models for all sorts of reasons, not the least of which is that you can “feel” the mathematics in many of his folds. This one was certainly designed using his computer program “treemaker”, and is embodied proof that with a little care it is possible to imagine and design anything of arbitrary complexity in origami.
A glass headed pin to complete the nose and we have Rudolph, then not so much a reindeer as an elk (apparently they are touchy about this – who knew?)
This beautiful model completed my tree setting, bringing in the festive cheer for the family gathering – I hope it found you with similar good will to all mankind.
When our kids were little tackers, we went on a summer holiday to Mon Repos, North Queensland, to see the turtles laying and hatching:
During the night, exhausted loggerhead, green and leatherback turtles haul themselves out of the surf, up the beach, gig holes and lay eggs – on the same beach they, themselves hatched from years earlier.
When I first saw this turtle, I assumes it MUST have been papercraft – you know, glue, cuts – very neat but none the less it could NOT be a single bit of paper.
Browsing my JOAS Tanteidan Convention books, to me delight, I stumbled across Satoshi Kamiya’s instructions (HUNDREDS of them) for the turtle (not sure what version) and knew I had to give it a try.
The shell corrugation/tesselation alone is a masterpiece, but then you wrap the unused paper around and inside (forming an internal support for the shell to keep it peaked) and form flippers and a lovely head.
I am so thrilled with this, my first fold – I am itching to fold it again, but cannot for the moment justify the nearly 8 hours necessary, to then have 2 turtles in the house. I cannot imagine folding it smaller – I have seen it tiny but I am not sure my fat clumsy fingers would let me achieve it as so many of the shaping manoeuvres are millimetre precise when folded from a 60cm sq.
I love this model, it takes pride of place in my paper shrine. I have resisted the urge to tape it up solid, as it holds it’s form without assistance – genius design.
I have folded a few elephants – most concentrate on the head and ignore the rest of the animal – not so this little beauty:
This model has much solidity about it. It looks like it has bulk yet uses little paper to do this, an interesting haunch locking mechanism and a tight little bottom (ahem).
Taken from Works of Satoshi Kamiya Volume 2, this is the most elephantine figure I have yet folded and uses some lovely techniques to use the paper very efficiently, yet result in a free-standing, locked model.
The hind quarters, particularly, are well formed, with a cutesy tail and toe nails and all – very nice Mr Kamiya.
I think this model would work on a much bigger scale – maybe when a sufficiently large sheet avails itself I might give it a go.
I am enjoying working up to some of the more challenging folds in this book – some are just plain bewildering to me at the moment but that confusion too shall pass eventually I hope.
I was leafing through my latest Tanteidan Magazing (Japan Origami Society journal) and came across a layer management exercise by Hideo Komatsu:
Having bought a pack of 2-colour (different colour front and back) paper, some green/brown, I was looking for something to try it out on.
This is slightly complicated, but ends up looking a little like a little snake curling back on itself a couple of times – layer management and colour changes mean the snake and it’s background are fairly distinct.
Hideo has many other models, I like the strong style, heavy abstraction and interesting sheet management evident in his work (having a few in the 365+ collection already) – I must track down more of his work.