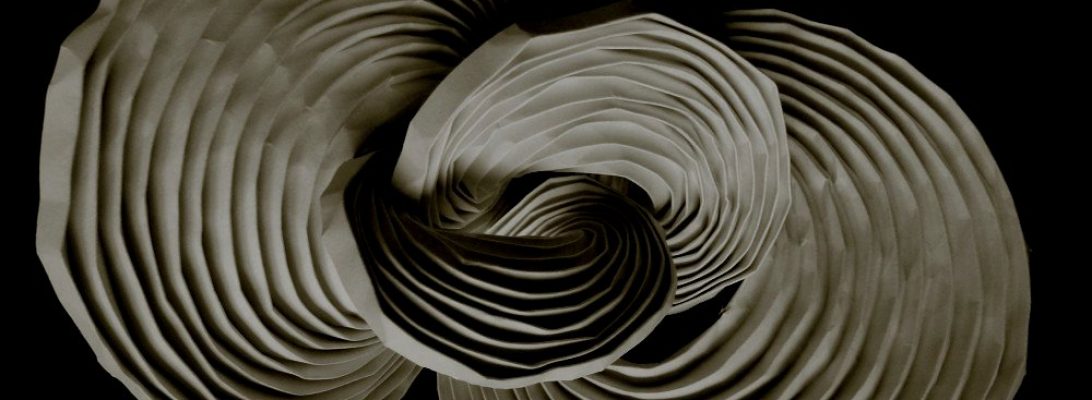
This is ‘Red Flower’, the base fold of which there re many variations, but the base molecule is based on a square grid and (for single molecule at least) simple to pre-crease and collapse.
When you scale up, accuracy shows itself as important – slight errors mean that the internal collapses twist the whole sheet out of shape.
Our local community Library has display cases, I have more origami models in storage that I can count any more so offered to provide some models for a month or so for a display:
The interesting part of this was selecting a variety of models to demonstrate the breadth of the discipline. The challenge was to select only enough models to fill the small display cases.
I decided on a varied collection of single sheet figures, modulars and old favourites, the mix is eclectic and dizzying.
The exhibit is on display at least until the end of August, possibly longer.
When I saw the folded form I thought there must be some trickery here:
All I had access to is the crease pattern (CP) for this model, and, given I am trying to develop my CP solving skills I thought it fair game to give it a try.
Based on a 16×16 grid, some strategic box pleating and an ingenious colour change we have a classic music stand, 3 shapely legs and a piece of sheet music that is a different colour to the stand – magic.
I like this model a lot – it just sort of coalesced in to a successful model for me, although the first fold was on paper that was same both sides but I could see the potential for colour change and had to fold it in duo paper,
I try not to let folds beat me, but honestly, until now this one has. I have attempted Eric Joisel’s ‘Le Coq” more that 6 times, this is really the only fold of it I am happy with:
Continuing to fold models that are part of a competition I was eliminated from is part of the motivation, but a “hidden” technique, published obscurely (not in my library) surfaced that allowed for a layered/ruffled breast and clarified the eye/comb and “bingo!”, I finally get it.
This model is folded from a 1m square of Officeworks Kraft paper, measures 20cm toe to comb, and is all attitude. One of our fondest memories of France was the bicycle tour to Giverny (Monet’s house) via Vernon. While in Vernon, looking for baguette and cider, we stumbled across a bric-a-brac store that had resin chooks – we fell in love with a rooster we subsequently bought, naming him “Vernon”.
It is the days you do not look in your mailbox that mail arrives – I arrived home from work to find an astonishing collection of paper from Pham Hoang Tuan’s origami shop, and a couple of his diagrams, all screaming “fold me!”, so I started that journey:
I had only ever seen this model complete and in CP form, failed at solving that CP 2 times and had given up folding it for now, then it arrived in diagram form to my delight.
I took my time, learned lots from initially failing, made sectional maquettes to check techniques and really enjoyed the process of folding.
This model is such a synergy of techniques – I can see influences from so many of Joisel’s other creations (many of which I have folded before). The initial collapse is vaguely humanoid, but the shaping is the making of model. So many details to control. The face and hat are tricksy but I an really happy with the level of detail I managed here – he has a playful but chilled character, smug smile and refined face – the mask is jauntily sitting on his nose also.
The fabric effects to the sleeved and pantaloons are a nightmare – to make them seem to “drape” is really hard I found, but eventually it came together. I pre-creased some quilted effect on the bodice and skirt which I am really happy with, and the collar took me ages to nut out. He is in full stockings (diamond pattern), has goofy shoes, a fly-away in-action wavey cape and open hands – so many bits were there waiting to be shaped. One can only marvel at the genius of the design.
Cruising Fakebook, as one does, I came across a fascinating origami geometric mindf*ck:
Edu Solano Lumbreras kindly shared instructions for his design, having adapted the techniques used in Thoki Yenn’s “Umulus Rectangulum” corners, to make this tesseract like cubic möbius strip.
Comprised of 6 modules, with some exacting pre-creasing that lends itself to template work, you fold bent square tubes with 3 corners – the shortest corner makes the “tab”, the opposite end becomes the “pocket”.
Folding in a4, the geometry is just as elegant, if exacting.
Looking through my Origami Library, I realised I had bought “Origami Tessellations for Everyone” by Ilan Garibi back as the pandemic hit early last year, and realised I had yet to fold anything from it at all:
Early last year was crazy times – bushfires, floods and then lockdown from Covid-19, this book got buried in my reading pile so it is time to begin the journey of exploring tessellations more formally.
Starting at the beginning, with the “Cubes Family”, this is “Cubes”, a deceptively simple tessellation of twisted cubes. I present the “molecule” – that is the tileable unit:
Now 2020 is winding up fast, and I say for the most part – good riddance. We decided to stay home, low key, but New Years Eve is not complete without “fireworks”:
I decided to fold a modular, found a relatively simple one then discovered it challenging because of volume and construction. This model is my fireworks – an explosion of colour and emergent geometry.
Folded from 90 separate pieces of paper, 30×1:2 rectangles and 60x 1/2:1 triangles – I decided to go with cherry blossom tones, the resultant “Star Pocket Kusudama”, designed by Sansanee Termtanasombat (Praew) from Thailand is a geometric treat indeed.
Exploring the geometric folds of Rebecca Gieseking, I was taken with cyclindric transformations:
Using calculated crease patterns, a cylinder can be “shifted” using a peculiar tapered spiral, or “bent” using a curved “gusset” – interesting stuff,
Folded using printer paper, I think it would look nicer with slightly heavier paper, the trick is accuracy and crisp creases. I must explore these techniques more.
This started as pure procrastination – I had marking and reporting to do but ….
Folded from a “live guide” photodiagram series produced by Daniel Brown, as part of a channel in a discord from another planet, irresistible as it is yet another variation of eastern dragon I knew I HAD to fold,
This little fellow is nearly naked – apart from some glue to hold in a wire spine and wires for arms and legs, he is otherwise folded only (hence some of the wayward seams and flaps). I quite like this unfinished appearance and think he will stay as is.
Folded from 90cm natural Kraft, it starts with a therapeutic 64 grid on the diagonal and goes to hell in a handbasket from then on. The basic folding is quite straight forward (as a Ryu master), this variation is a bit of a mashup between a 1.2 and the head of a 2.1 – the result is wonderfully complex and beautifully “Kamiya” in intent.
I decided to fold it in plain (both sides same) paper as the bi-color fold has a large gash of reverse side colour along the underside – I have used this to effect in both a 1.2 and a 2.1, so thought I would go differently this time. Interestingly (to me) this little chappie is folded with a sheet exactly 1/4 the size (and from the same paper roll) as my original 3.5 (a little Ryu Jin nerdistry there).
I recently got a copy of Mi Wu’s new book “Duo Color Origami” and knew there were models I had to try:
Colour change is a tricky thing, designing to deliberately form patterns with the reverse side of the page is a real skill and Mi Wu seems to have mastered it, his book contains many unique and very challenging models.
I cannot for one moment pretend that all my folds work out – indeed I have sent LOTS of paper to landfill as twisted wrecks of models i have later mastered.
A single week (with work, life etc) for me was not a challenge I could complete – the Harlequin model is a glorious extension of a “gnome-like” structure, the pre-creasing took me 2 days alone.
I managed the collapse, fairly cleanly, managed to isolate all the key features (face, hat, bow, cape, arms with ruffles, skirt and puffy-pants legs with diamond stockings. I ran out of time shaping, sadly.
Wet folding requires application of water and/or MC, molding, clamping and waiting for it to dry before moving on – the process is tedious, long winded if you have to go to work, sleep etc as well as shape. A piece like this would typically take at least a week to shape alone, so I am not sure it was a good model choice for a week challenge – that said, a couple of folders managed it – I have no idea how.
I will re-fold this, when I am less time-restricted. I am sad I did not complete the challenge actually – it upset me to think I did not have a week 4 entry. the process of acceptance has kicked in however and I am stoic enough to look back at what I did achieve over the past 4 weeks. I am inordinately proud of my efforts, regardless of what the judges thought.
I reflect on Joisel’s legacy a lot – he passed 10 years ago today, I remember the shock that consumed the origami community at his passing, but celebrate his artistic contribution – he re-defined shaping, “breathing life into paper” like no one else.
If you are interested in the challenge, other entrants and the whole shebang, go here: https://tributoajoisel.wordpress.com/ for the tribute competition home, galleries etc.
My blog suggests that there are mostl successes with my folds, this is far from the case. I had decided some 5 years back, that I was going to master “Mermaid” by Eric Joisel, and indeed I have tried on a few occasions and failed.
It turned out that “Mermaid#1”, the less attractive of his collection was the subject of Week 2’s intermediate challenge (intermediate they say!!!?!?! Bahahahahahah.). In my confusion, back when I thought it was “choose ONE of thes models and fold it in 4 weeks” I had actually chosen mermaid, because. I recently learned it was fold 1 new model each week, AND copy the work of the master as close as possible. While I am not entirely sure this is respectful, and while I totally fucked this up with week 1 (I did an INTERPRETATION, not a copy, and scored few points for my best gnome ever which was quite disheartening), I am perservering because I like the challenge – it is good for my head.
This is the 4th model in this batch of folding. It is not perfect, and I will probably not be keeping it, but it is as close to a copy of the original as I can manage. Realistic human figures are hard, curves, breasts and soft tummys with delicate bellybuttons are even harder.
So this started as a cautionary tale – I saw the a competition, in Spanish, where they were celebrating the art legacy of one of my favourite designers of all time: Eric Joisel. My initial “skimming” of the competition was “pick a level, choose a model from that level’s choices, fold that model” – easy, right?
I chose “Intermediate”, no real idea why, but I did, and was accepted. Just before the comp started, I get an email welcoming me to the competition and detailing Week 1’s challenge … wait!?!? What!?!?!
Turns out I signed up to fold ALL of the intermediate models, one a week for the next 4 weeks. I have no idea if I can actually fold some of the models in this category, but am (after the “reorientation”) prepared to give it a crack.