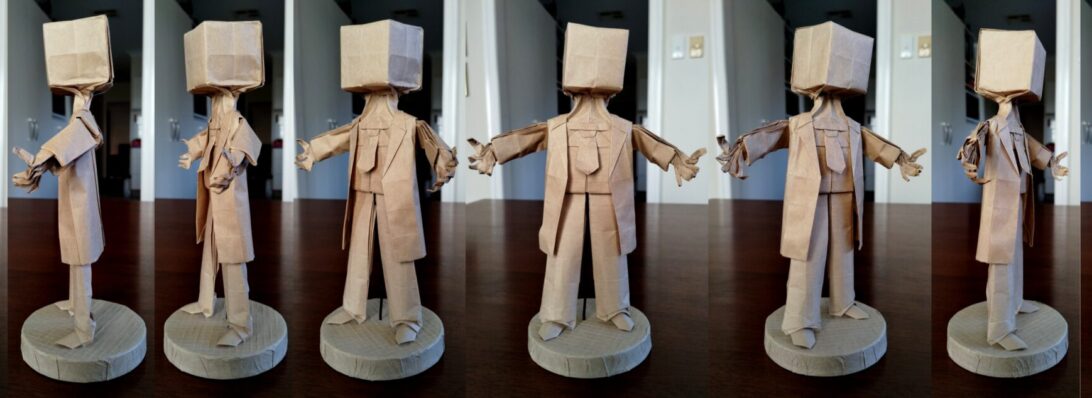
1155: Dasa Star

Inspired by a friend and fellow folder (should out to @aboy021), I decided to throw a 60cm square at Alessandro Beber’s “Dasa Star”:

Carving a hexagon and laying in basic axial creases, initially the paper is collapsed into a tato (envelope) and then re-folded into a tato to form a pinwheel structure as the base.

Then, in a process reminiscent of the algorithmic fractal sequence of Shuzo Fujimoto’s “Hydrangea”, we go through processes of teasing paper until it is no longer free, then flipping over and feeding more paper through the middle structure in a “paper pump”, then flipping over and teasing again.

Continue reading

Short-Beaked Echidna

There are only a few origami figures I MUST have in my collection – Steven Casey’s “Echidna” is one of these:

This adorable little monotreme is covered in one of my favourite square-grid tessellations, but skillfully crafted to allow all the other body bits to be where they need to.

I bought the British Origami Society booklet describing how to fold this treasure as soon as I knew it existed, and have folded it a few times now. Some sequences are nightmare fuel – this one is just so enjoyable to fold.

I recently received a shipment of paper from Origami-shop.com and in it was a 65cm 11 colour pack of the NEW Shadow Thai paper. I last bought it in 40cm square form but it was THICK so to my delight this version is thinner and takes complex folds really nicely. I chose this fur-like colour because it most closely matched the quill and hair colour of an echidna.

Continue reading

Display

My annual origami display at Holland Park Library was installed this morning:

Cabinet 1 views

Included is a broad range of origami styles from a huge and diverse collection of designers, folded from a varied collection of papers.

Cabinet 2 views

I am trying to get better at not crowding the display cabinets – sometimes less is more to allow individual models to shine – let me know how I went.

If you visited, I would love your impressions, comments and suggestions for future displays.

Get directions here

1142: Daniel Brown’s Seamless Chessboards

Having folded Steven Casey’s 8×8 40 grid seamless chessboard and singularly failing to fold Marc Kirschembaum’s 40 grid because of crease-creep inaccuracies, I was approached by Daniel Brown and asked if I was interested in his chessboards – naturally I jumped at the chance. “Seamless” chessboards are deliciously more complicated because it required each square to be represented by an un-broken surface (as opposed to being able to be comprised of bits and pieces of layers – a much easier path):

A "clusterfuck" of seamless chessboards
A “clusterfuck” of seamless chessboards

I say CHESSBOARDS because Daniel has developed a series of coloured/white alternate seamless models of LOTS of sizes, and the skills necessary to migrate edge paper towards the centre to effect colour changes is a thing that needs some work and, often, particular “widgets” (or self-contained localised fold structures).

I started with the 4×4, rather efficiently designed on a 9×9 grid ( 0.444 efficiency). I had a piece of blue-white kami, so gave it a whirl. Even dimensions require different approaches for adjacent corners as they are different colours – the same colour corner exists on the diagonal.

Continue reading

Future Folds: Panel discussion and Exhibition

Coupled to 8OSME, RMIT Design Hub is currently hosting an exhibition of important origami works called “Future Folds”. The opening event featured a panel discussion with Tomoko Fuse and Robert J Lang.

Panel discussions can be wonderful if the alchemy is right – the right combination of guests and questions. I am not sure we got a stellar set of questions posed, but it was encouraging to hear the guests speak of their obvious love of origami, and interesting to hear about their differing approaches to the artform.

We then proceeded to the gallery space to view a number of precious “holy grail” origami objects. Presented as the centerpiece was a large scale installation of Tomoko Fuse’s “OROCHI” (or large snake) – beautiful organic tube sculptures that seemed to have a life of their own.

Around the walls of the gallery were astonishing things, many of which I have only ever seen in documentaries and books – Tomohiro Tachi’s “Rabbit” for example. This was posited proof that using “Origamiser”, you can construct a crease pattern to replicate ANY 3d object using folds only. An amazing demonstration that would have been a nightmare to actually fold, but entirely possible to do so.

We saw some lovely examples of Jun Mitani’s curved fold works (some I have the CP of but have never successfully folded) and some original tree-maker inspired circle-packed designs for bugs and lobster from Robert Lang.

Present also were some lovely spiral forms and tessellations by Tomoko Fuse and an assortment of other precious folded things.

It is rare for such works to make it to Australia, and I was so glad to have been able to see them.

8OSME – Melbourne, July 2024

An unmissable opportunity presented itself where both OSME and Folding Australia conferences were to be hosted in Melbourne, Australia, one following the other. Having never attended an Origami conference (of any flavour) before, I jumped at the chance, but had little idea, really, what was ahead.

Diverse plenary lectures to start the days off

My wife and I got an Air BnB on Collins street for the week. Using the PT> train network, I travelled to and from Swinburne Uni for the international gatherings each day while Jo explored Melbourne Galleries and cafes.

I believed OSME stood for Origami, Science, Mathematics and Engineering – turns out the “E” was for Education, even though in this conference there were 2 Engineering strands … so, ok then. It seems the 8th iteration of this conference reflects origami/folding now so popular as an engineering concept.

A Myriad of parallel papers
Continue reading

1138: The Power of Many

I love the geometric world of Tessellations, and have folded many. It is doubly satisfying when you design that tessellation molecule and how it tiles yourself.

This is a hex-point tessellation, and is based on a mathematical algorithm discovered by Aurélien Vermont ( @auregamiiii ) and described in a paper written by them as part of their study in Engineering. The algorithm describes a geometric construction method that lest you raise a n-finned spike from a flat surface and have the surface “heal” around it.

It does so by placing strategic dart pleats that seamlessly absorb the excess paper caused by the spike in a controlled and very flexible way. You can raise a spike at the intersection of a collection of creases (2 or more intersections). The folding gets progressively more fiddly the smaller the spike and the larger the number of intersecting lines.

I chose to derive a hex-spike, that is a 6-crease intersection spike molecule, based on a regular hexagon. Once I had derived all the creases necessary to allow one spike to be raised, I test folded it (just to check – theory and practice are sometimes at odds – some paper designs for origami seem to ignore the thickness of the paper which then breaks the symmetry or distorts the shape) and all was good.

Continue reading

1135: Steven Casey’s Seamless Chessboard

Colour-change models are astonishing to me, designing models that use colour change are something special:

I have folded a number of different models like this, nothing quite like it however – what sets this model apart form any other is that each “tile” on the board is a seamless square.

Folding this from a SINGLE UNCUT square ends up being a bit of a brain-fuck. The paper was blue one side, white the other (actually cheap and nasty 70cm wrapping paper from my local dollar store). Distributing the “colour” is achieved, mostly, by bringing the sheet edges up through pleat bundles using a variety of techniques.

You can see the final location of the 4 corners of the original sheet in this development photo:

Planning/designing of a model like this is beyond me – pre-preparing the colour changes means that every bit of the paper has a job – either visible “tile”, spacer, flipper, mover etc to get the bits of colour to get where they need to go. Fold accuracy is the make or break of such designs – novices who use a “near enough is good enough” approach will not succeed here.

I was asked to test fold this, by Steven Casey, prior to publication. The diagrammed sequence is intense, starting with a 40×40 grid. Most of the folding is working on the wrong side, creating interacting pleat stacks that sit flat but that strategically manipulation pleat order. The run towards the “checkerboard” effect happens around the edges first, they they are migrated further towards the centre (although really only in a 4-unit strip around the periphery.

Continue reading

1102: The Offering

Tucked away in an inconspicuous corner of the deserted clearing, nestled almost invisibly among the leaf litter, the first signs of civilization were found in the form of a rough-hewn but definitely hominid-worked paper offering. For whom, to what, why … we shall never know:

Followers of the blog will notice occasional references to paper making pursuits. This post looks at the most recent results of a paper making workshop I attended in early July 2023. I had previously (back in 2019) been a member of PAQ (Paper makers and Artists, Queensland) but found full time work made attending events difficult. Now I am retired I have more freedom, so reapplied for membership.

The group’s interests in paper are diverse – from botanical paper making, monoprinting, encaustics, stitching, collage, pulp sculpture and more – my interests are (fairly narrowly?) folding, but it is important to have ones interests informed by a wider palette so I am very much the learner in that group.

Previous workshops I made sheets with finely beaten banana stem and cotton display board, day lily and lemongrass pulp, and still have some of the paper from that session. This session we pulped banana stem (coarsely this time) and mixed it with lemon grass, Philodendron, and South African Pigeon Grass stem, in various combinations. The pulp was added to water, then a suspension-aid made from water soaked chopped okra, which generates a mucilage that makes the vat water more goopy, helping the pulp to stay in suspension longer before settling out. The results were much coarser paper, but it presented an interesting challenge to see what I could fold from it.

I first pressed then dried my sheets, brought home still dripping. I carefully separated them from their couching sheets (old torn up bed linen) and selected sheets to process further. Using a fairly stiff batch of Methyl Cellulose, I stuck sheets to my glass and let them dry, reasoning (correctly it turns out) that the MC would make the sheets more pliable and bind the fibres more closely together (given some of them were very loosely bound, this seemed like a good plan).

Continue reading

1084: Square Spaceness

I have a huge pile of “must get around to folding this” models and “Square Spaceness” designed by Alessandra Lamio is one of this legion:

1084: Square Spaceness - plan view

Take a square, divide it into a 16×16 grid, lay in strategic mountain and valleys and you get this almost Escher-like tessellation molecule (meaning you _could_ put multiples of these if you had a more expansive grid with some tweaks and a bit of smush).

Charged with the confidence Advent of Tess gave me, I knew it was time to give this a whirl. There are many long slight diagonal valleys that make up the bulk of the geometry for the inward sloping spirals, and the corner widget is ingenious as a lock, and adjusting the outside pleats lets it sit flat – love it.

1084: Square Spaceness - diamond view
Continue reading

1082: Advent of Tessellations

It was late in the semester, I was looking for a folding project (to add to the other 4 already on my board – procrastigami strikes again) and noticed in my feeds a 25-day program by Madonna Yoder called “Advent of Tess”. I guess I am supposed to know about Advent, having worked in a Catholic boys school for 33 years, but… apparently it is the 25 days in December leading up to Xmas (learn something every day)

The idea was that Madonna released a CP and a video tutorial each day for 25 days, victims start with hexagons of paper pre-creased into 16-grid triangles, and collapse increasingly difficult combinations of tessellation techniques on the page.

1-5 (front/back/backlit): Cluster 6, cluster 4, cluster 6 alternating, cluster 4 alternating, HT6 closed alternating

The first few were easy, and collapsed simply, but then I decided I did not need the tutorials and proceeded to mark up the paper with the day’s CP and collapse from that. This approach came awry pretty quickly as the elements began to argue for the same real estate on the sheet and I learned that sequential development was way more sustainable.

The folds started with closed triangle twists (something I had done a lot of previously, so found accurate placement of these fairly easy. We later progressed to “open” triangle twists, which are much harder, and require a “setup” that uses paper tension to define the lines off-grid that were the sides of the triangle.

6-10 (front/back/backlit): Triangle double-bar wells, shrinking violet, studded wheels, radiant, dancing ribbons

We then progressed to closed hexagon twists (again, something I had done lots of beforehand) and refined them into “open” hexagon twists – a fascinating variation of a “star puff” of which I had passing familiarity.

Continue reading

1068: Russian Lilac Module

I stumbled across the instructions for a glorious checkerboard kusudama designed by Andrey Ermakov, an insanely talented designer from Russia:

Russian Lilac unit designed by Andrey Ermakov
Russian Lilac unit

I decided to try and make ONE module – an exhausting process that starts with a HEXAGON initially divided into a 16 grid, then you dance through moves that flash and hide the reverse colour of the paper until you get this lovely pattern. This took me in excess of 2 hours!!! For ONE unit!!!!! You then crenelate and interweave them to make a spikey ball, tucking in tips to complete the tessellated surfaces.

Russian Lilac shaped to allow others to interlock.

Had I no life, and a LOT of paper, I would consider making all 30(!?!?!?!) of these things necessary to make the most complex spikey ball there is – a beauty that is not within my reach (for now) due to time pressures.

It is a timely reminder that astonishing and beautiful things come from Russia; ugly political and military action does not diminish this fact.

1058: Twister A

Clocking on for another round of procrastigami, I decided to give the first of the “twister” series a go:

Twister A by Ilan Garibi - 2x2 molecules
Twister A – 2×2 molecules

This is “Twister A”, designed by Ilan Garibi, a lovely dimensional fold with a final twist to finish it off.

I have folded a few square twists, this one perches a twist on top of the intersection of opposing ridges, contains remarkably few folds on top of the base square grid.

Twister A by Ilan Garibi - molecule
Twister A Single Molecule

The basic molecule tiles awkwardly – because of the directionality (it forms in a clockwise direction) of the molecule, you have to reverse adjacent molecules if you want them to line up.

Continue reading

1057: In ‘da ‘Hood

Exploring Ilan Garibi’s lovely book “Origami Tessellations for Everybody”, the next “family” of folds starts off with “Childhood” and then evolves into more of the same:

childhood evolved
Childhood-Evolved (4×4 molecules)

This is almost a corrugation, as there are nearly no layers overlaying others – the surface treatment is deliciously dimensional, and the distortions are caused by paper tension and torsion of the underlying square-twists.

Childhood Molecule
“Childhood” molecule

I started with standard cotton-based photocopy paper (which for me is a LOT like thin Elephant Hide) and laid in a square grid. Both childhood and childhood-evolved use off divisions. I folded a regular division (halves or thirds), then halved until I was close to the required grid sizes, then sliced off unneeded units before laying in the wedge-shaped mountain creases.

Continue reading

1056: Red Flower Tessellation

Exploring the rich and intense world of tessellations, I decided it was time to try the second family of folds described in Ilan Garibi’s wonderful book “Origami Tessellations for Everyone”:

Redflower Tessellation Scale

This is ‘Red Flower’, the base fold of which there re many variations, but the base molecule is based on a square grid and (for single molecule at least) simple to pre-crease and collapse.

Redflower Tessellation Molecule

When you scale up, accuracy shows itself as important – slight errors mean that the internal collapses twist the whole sheet out of shape.

Continue reading